Need to decorate the tree but worried about cat safety issues? You should be! Cats are notorious for messing around with holiday decor items and some ornaments can be dangerous for them.
Our longtime member and advisor Laura - aka @Columbine on the boards - has prepared a wonderful list of ideas for DIY holiday ornaments with gorgeous illustrations too! Her crafty ideas include cat-safe ornaments created using -
- Needle felting
- Beading
- Clay
- Crochet
- Cross stitch
- And much more!
Keep reading to see her beautiful artwork and hear her advice. Handing the mic over to Laura -
It’s that festive time of year again when preparations for the holidays get into full swing. Images of perfectly-decorated Christmas trees are everywhere, and stores are once again filled with row upon row of gorgeous ornaments and decorations.
Naturally, thoughts turn to decorating our own homes for the season. There’s a problem, however… and it has four paws, whiskers, and a tail! All these beautiful, glittering ornaments are perfect and tantalizing toys in the eyes of our feline friends, which can have disastrous consequences culminating in an emergency vet visit and maybe even surgery.
There is a solution: homemade ornaments that are safe for inquisitive kitties.
Note, I’m saying cat-safe, not cat-PROOF. Not all of these suggestions will withstand being used as cat toys (though a few might, depending on your cat), but they’re less likely to hurt Kitty if (s)he does pull them off the tree.
The following ideas vary in skill level, but there should be something accessible to even the least ‘crafty’ reader. Many are also wonderful to make with kids - I loved all kinds of crafting when I was little.
Needle Felting cat-safe decorations
This is actually a very simple core technique, but it can produce stunning results.
Tools: Felting needles; wool roving/felting wool; a block of foam (at least 1 inch deep, preferably deeper)
Optional extras: Finger guards; a needle holder

Cookie Cutter felted ornament:
This is probably the simplest way to try felting. You will need the tools listed above, a suitably festive cookie cutter, a sewing/tapestry needle, narrow ribbon for hanging. Optional extras - regular needle and thread, beads or buttons, ornament hanging hooks.
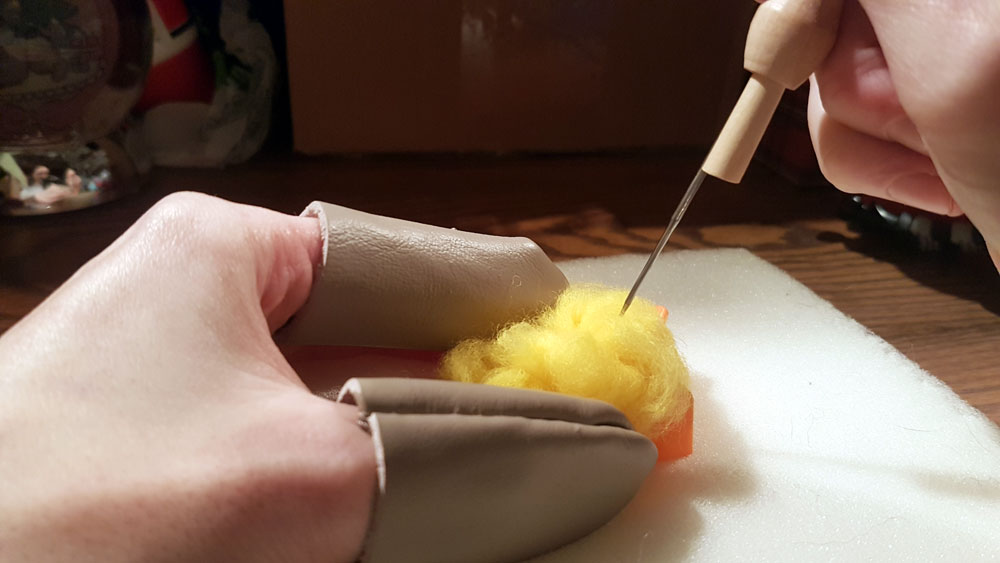
Take your cookie cutter (I’m using a star here) and place it in the middle of your foam block.
Take some wool roving (can be any color or even a mix of colors), with the total being approximately three times the size of the cookie cutter.

Stuff the wool into the cookie cutter and start poking it with your felting needle. Use a straight up-and-down motion. It's the tip of the needle that does the work, so don’t push it in too far. Make sure, too, that you don’t go right through the foam block and hit the table - this is the surest way to break your needle.
Keep poking the wool until it mats together fairly solidly and takes on the shape of the cutter. At this point I like to turn it upside down and felt on the underside of the shape too, just to make sure it’s evenly bonded together.
Once you have your shape, you can remove the cookie cutter and work on the sides as well as the front and back. It should be feeling solid but malleable now - rather like clay. Keep poking and shaping until you’re happy with the shape.

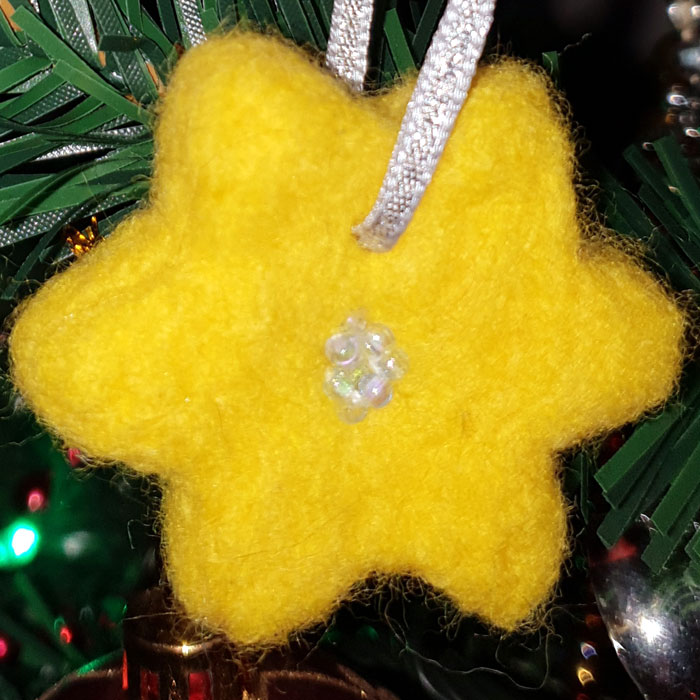
Once you’re happy with it, you can add the ribbon or hanging hook. I chose to use a big-eyed tapestry needle to thread the ribbon right through the piece, but you could use an ornament hanging hook if you prefer.

After this, it’s up to you! I decided it looked a little plain on its own, so used a regular needle and thread to sew on some beads. Alternatively, you can stick with the felting technique and use different colors of wool to create a design, as I have done with some other felted ornaments (see below).
Felting over a styrofoam form
This is a great way to save on wool (and keeps costs down). Styrofoam forms come in many different shapes and sizes, but the most readily available shape for tree ornaments is balls.
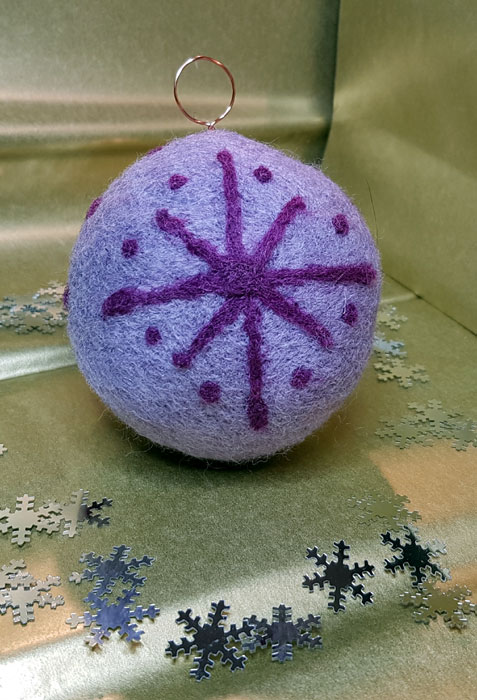
Simply take some wool roving, place it over your styrofoam form, and start poking with a felting needle. The basic technique is the same as above, but you need to make sure the needle goes a little way into the styrofoam to get the two materials to bond together.
Once the ball (or another shape) is evenly covered, you can move on to embellishing it. I used wool roving in a contrasting color to create a snowflake design here, but your only limit is your imagination!
There is one limitation, however: unlike the cookie-cutter ornament, you can’t sew beads or other embellishments into a styrofoam-based ornament. Embellishments need to be felted or stuck into place.
It's very common to see sequin ‘ribbon’ (or indeed actual ribbon) pinned into the bauble, usually to create four segments. I’m a little uneasy about this approach where cats are concerned though, just in case a pin came loose.
When you feel your ornament is finished, you just need to add an ornament hanging hook, and a ribbon loop to hang it by on the tree.
SIGN UP FOR THECATSITE'S EMAIL UPDATES >
Variations to felting projects
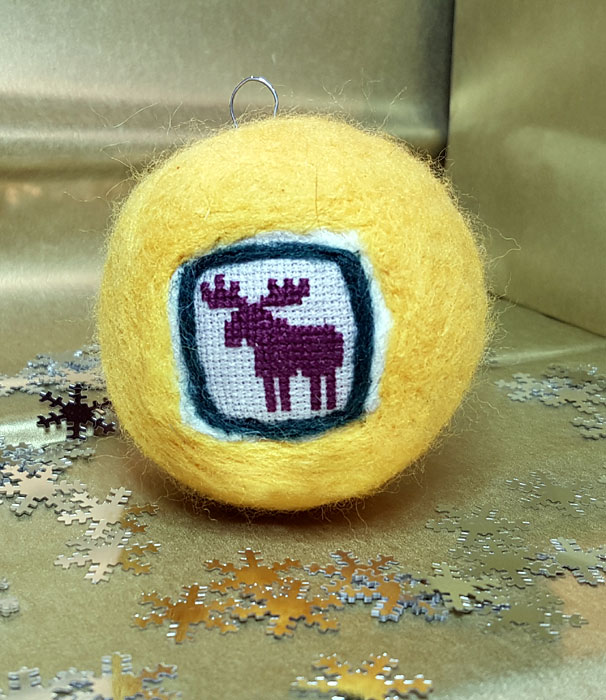
I combined two different crafts here and used wool roving and felting needles to attach a cross-stitch motif as the centerpiece for this felted bauble.
Felting over a pre-made felt form
This technique is almost identical to felting over styrofoam. The beauty of using a felt base is that the sky’s the limit when it comes to shapes and designs. I made these snowmen using a felt ball as the starting point for each tier but was able to build the shape up far more than styrofoam will allow me to do.

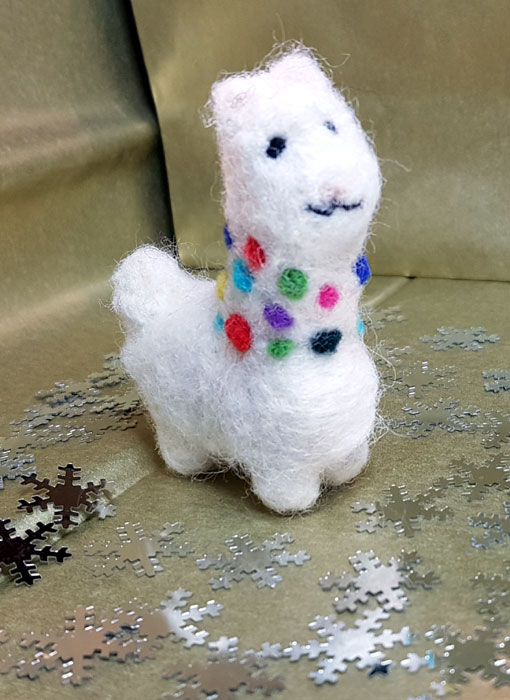
This llama started out as a couple of pre-made felt balls, too. It really shows just how much more versatility felt bases have over styrofoam ones.
Fillable ornaments cat-safe decorations
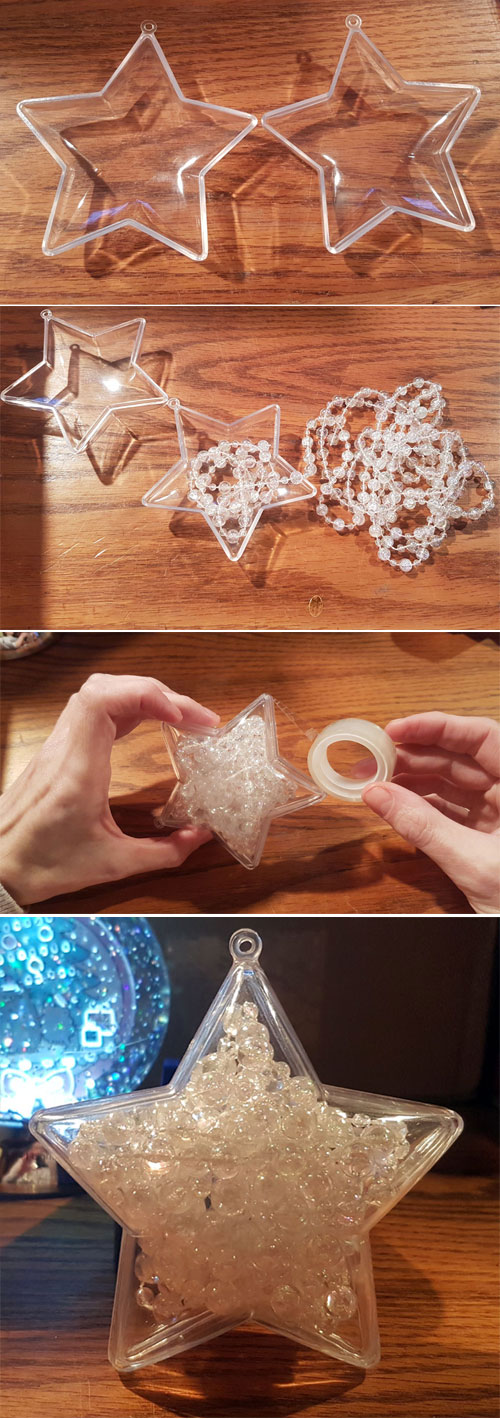
If you go to almost any craft shop at this time of year, you’ll find plastic two-part ornaments and baubles for you to fill yourself. This is an almost instant, cat-safe decoration….just so long as you give some thought to the filling.
I chose to fill mine with a plastic bead garland and then taped it up the sides. I chose the bead garland so that, if Kitty does break it open, there’s nothing that can do any harm.
Also, on a practical note, a bead garland is very easy to pick up - much easier than loose beads!
Decoupage cat-safe decorations
Decoupage is a wonderfully versatile way of creating all kinds of fun ornaments. Even better, anyone can do it, and the tools are very simple and easy to find.
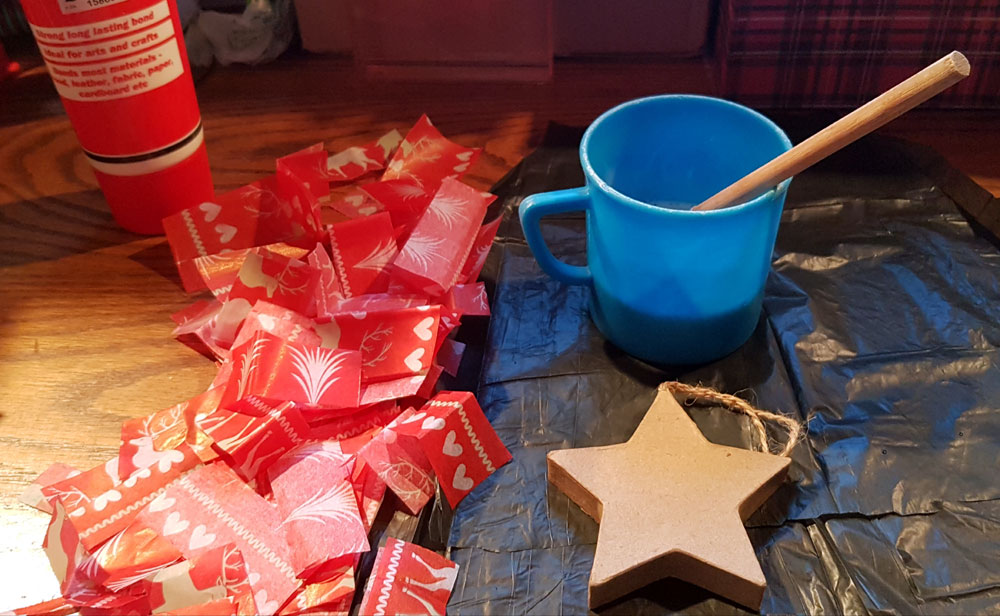
Tools: paintbrush, decoupage glue (I used 2/3 PVA glue mixed with 1/3 water, but you can get a specialist glue like Mod Podge if you prefer), scissors, lightweight pretty paper (I used Christmas tissue paper), mache, MDF or styrofoam forms.
Mache forms usually have hangers attached, and MDF shapes often have holes for ribbon or cord threading. If you’re using styrofoam forms, though, you’ll need ornament hanging hooks. Oh, and decorating supplies of your choice!
Cut up your paper any way you like. My hands aren’t great, so I just cut mine roughly with a guillotine.
You can get really fancy if you like, though - cutting out pictures/motifs on the paper and using careful placement to make something really special.
Set up your workspace. I like to put plastic down to work on, to keep things cleaner, and get the glue set up in a container for easy brush access.
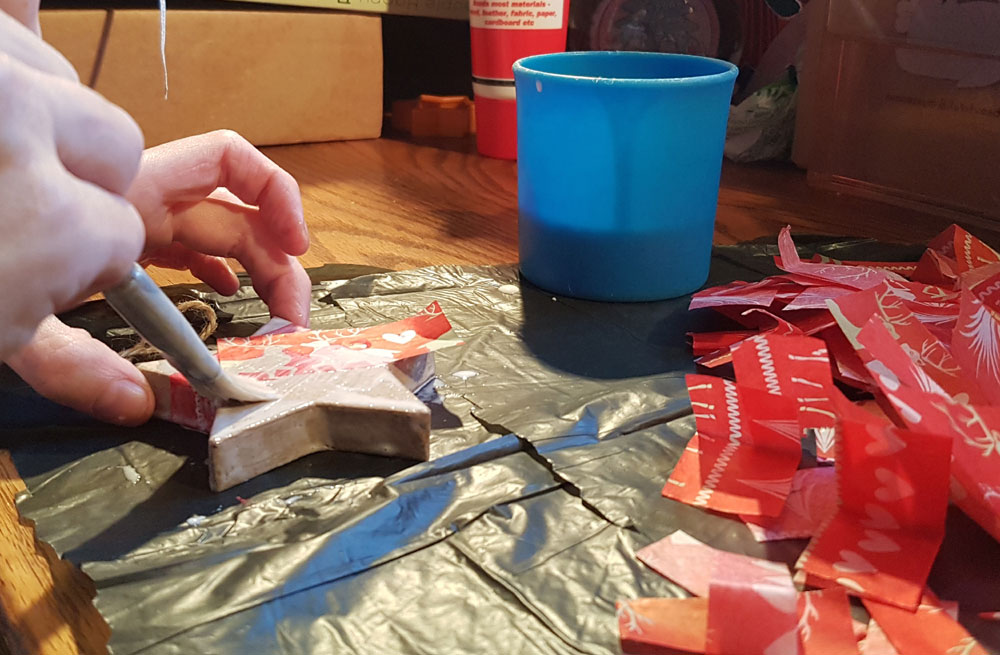
Decide where you’re going to start and paint some glue onto your form. Start placing the paper onto the form, and paint another layer of glue over the top of the paper.
Continue in this way, and cover the whole form. I like to do a few layers, then leave the ornament to dry thoroughly (I leave them overnight to be sure).
Once the ornament is dry, have a good look at it and decide if you want to add any more layers. If you want to add more, repeat the gluing and layering process until you’re happy, then leave to dry again.
Once you’re happy, you can move on to embellishments.
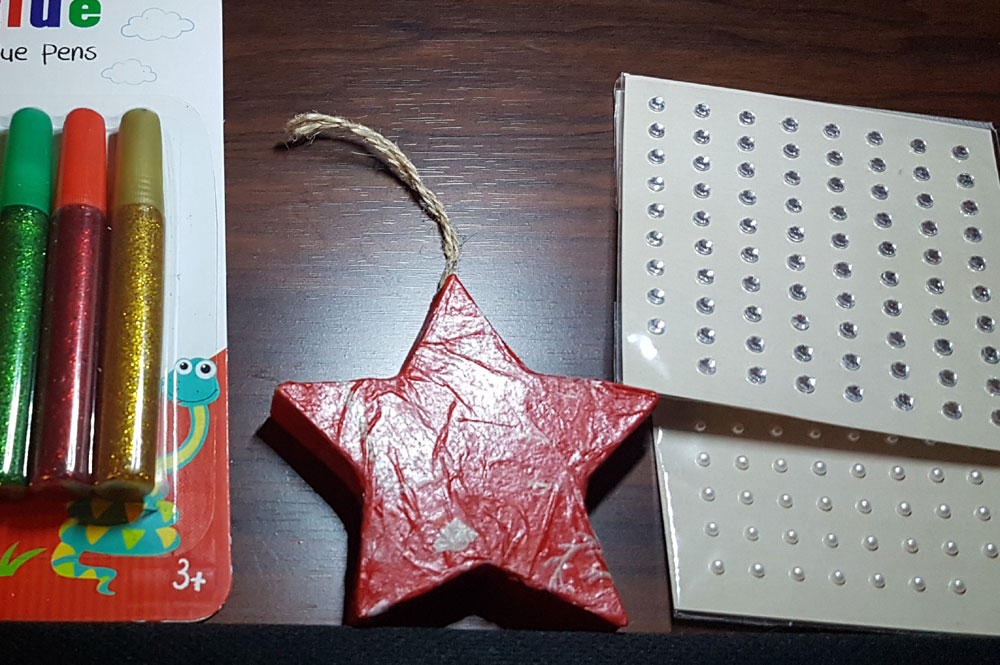
This is where the fun really starts, and where you can let out your inner child. I started with glitter glue (always a go-to at Christmas).
I started by trying to pipe the outlines/details of the ornaments with glitter glue, but it didn’t come out smoothly. The first rule of decorating is ‘there are no mistakes’.
I switched from doing an outline to covering the whole ornament in glitter glue, using it as a top coat rather than a delicate design feature.
After using any kind of glue, even glitter glue, leave to dry overnight.
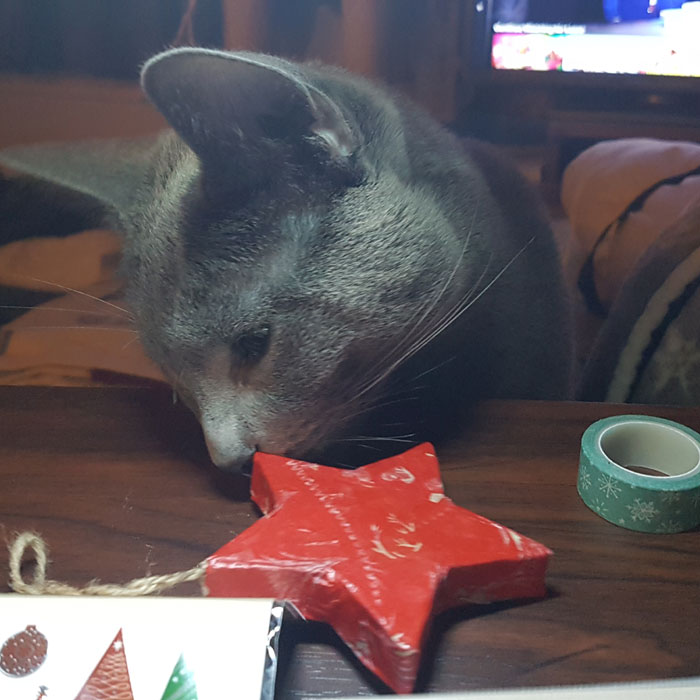
The cats stole the styrofoam ornament when I was working on the star, and I didn’t realize it right away.
The teeth marks are a perfect example of my earlier point - the ornaments are cat-safe, but not cat-proof!
I got some festive washi tape in a toning color and design, to cover the worst of the teeth marks. Once again - if something goes wrong, turn it into a totally intended design feature!
Once everything is dry, you’re done, save for any final flourishes. I was happy with the styrofoam ornament as it was but felt the mache star needed a little something extra.

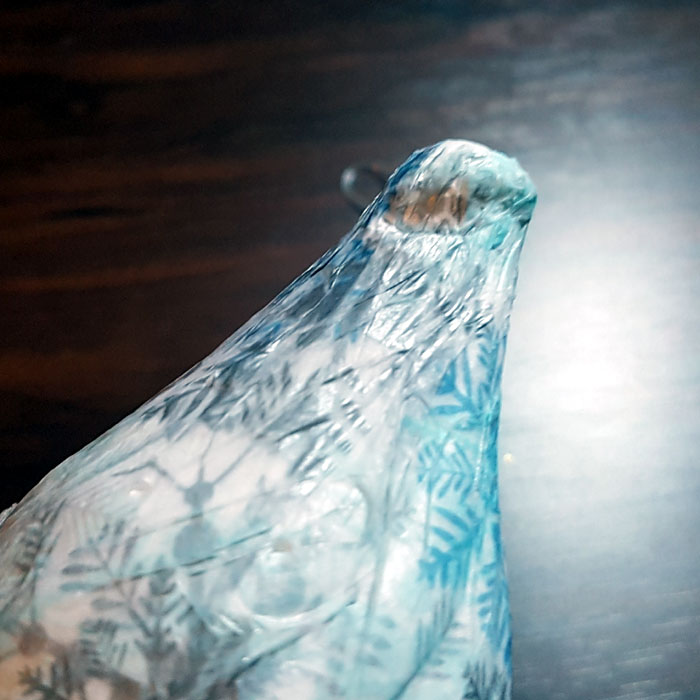
Variation - ‘stained glass’ ornaments.
Tools: scissors, glue, paintbrush as above, plastic sheet (I use heavy-duty trash can bags), dark-colored cardboard, templates, pencil, and colored tissue paper.
I learned this variation at school years ago! It’s great fun and very effective.
The cardboard will become your frame, so start out deciding what shape you want to use. I think of flat bauble shapes for these ornaments, so I’d use a ring or bauble outline.
Mark and cut out your frames - you’ll need two per ornament (front and back). Once you have your size and shape set, you can get started.
Cut (or tear) colored tissue paper into smallish pieces, and lay out some plastic to work on. then start layering the glue and paper as above.
The difference here is that you’re working straight onto the plastic. Build up a few layers, maybe with more of an eye as to the design or pattern you’re aiming for.
You can either make a bigger sheet to cut up for ornaments later or work to a slightly bigger size than the outer lines of your cardboard frames. Once you’re happy, leave it to dry overnight.
Once dry, you can peel off the plastic and attach your cardboard frames, on either side of the tissue paper design. Either glue the frames in place and leave them to dry, or use double-sided tape to fix the frames in place.
Once everything is dry and fixed, cut off the excess tissue paper and tidy things up. If desired, you can use washi tape to seal the edges of the frame together.
This adds a little extra security, hides the edges of the frames, and gives a pretty border to the ornament.
Finally, make a little hole in the top of the ornament, and thread some cord or narrow ribbon through for hanging. These ornaments also look great as window decorations.

Cross-stitched cat-safe decorations
Cross stitch is probably the most accessible style of embroidery, and is one of my favorite crafts. It looks really effective and worked into Christmas decorations. There are all kinds of patterns online these days, and many are free to download!
Tools: cross stitch/tapestry needles, stranded cotton (floss), cross stitch fabric (eg aida, even weave, perforated paper or plastic canvas) embroidery frame, scissors, patterns.
Extras: needle threader, ribbon (for hanging and edging), pins, pincushion, tailor's chalk. I find a pen really useful too, to stop me losing track of where I am in the pattern.
Start by choosing your fabric. Aida is the easiest fabric for counted cross stitches and comes in a huge variety of colors and sizes.
The size number indicates the number of stitches to one inch. The lower the number, the bigger and easier the holes are to see. I prefer working on 20 or 22-count aida, but 16-count (or even 18-count) is an easier fabric for beginners.
The higher the aida count, the smaller your pattern will come out.
You can also buy perforated paper or plastic canvas for cross stitch. This makes a much stiffer piece and is ideal for 2-D ornaments (or bookmarks and other stiffer items).
I turned a Pusheen cross-stitched motif into a 3-D stuffed ornament, using Christmasy fabric for the back, and a pretty snowflake edging to add some sparkle.
Materials: cross-stitched motif, Christmas fabric, stranded cotton (floss), tapestry needle, soft toy wadding/stuffing, festive edging, ribbon for hanging.
Extras: Pins and a pincushion.
NOTE - I chose to hand stitch this piece entirely, but it would be a lot quicker to machine stitch it together.
Also, it would have been a lot easier to attach the edging to the cross-stitch motif before assembling the ornament. You could say that planning isn’t my strong suit!
Cut the Christmas fabric and motif to the desired size (remembering to leave room all the way around for the seams).
Decide if you want to add a ribbon trim or other festive edging. If you do, pin and then stitch it in place now.
Place the two pieces of fabric together, face-to-face (so you’re looking at what will be the inside of the finished ornament). Pin the fabrics together, to keep things even as you stitch.
(If you’ve added a trim that will be wider than the main ornament, pin the edges to the front side of the cross-stitch motif. This will stop you from accidentally stitching half the edging to the inside of the ornament.)
Sew three sides of the ornament fully together, but only part of the top edge - you need space to poke the stuffing in!
Remove any pins still left on the edges. Cut across the diagonal on the corners, making sure not to cut your stitching. Then turn the piece right-side out.
Poke out the corners with your finger to get them sharp and even. (Remove any extra pins that were keeping the edging in place, if used).
Sew the hanging ribbon into place, one end onto the fabric side, and the other onto the motif side. It’s easier to do it now than later.
Next, stuff your ornament. Cross stitch looks best when pulled taught, so stuff the ornament as much as you can.
Lastly, hand-sew the opening at the top of the ornament so it’s fully closed.
This technique is also very effective worked entirely in Christmas fabric.
You can get more adventurous with the shape too - star shapes can look really good, or what about a candy cane shape worked in candy cane-covered fabric? As with all of these ornaments, your only limit is your imagination!

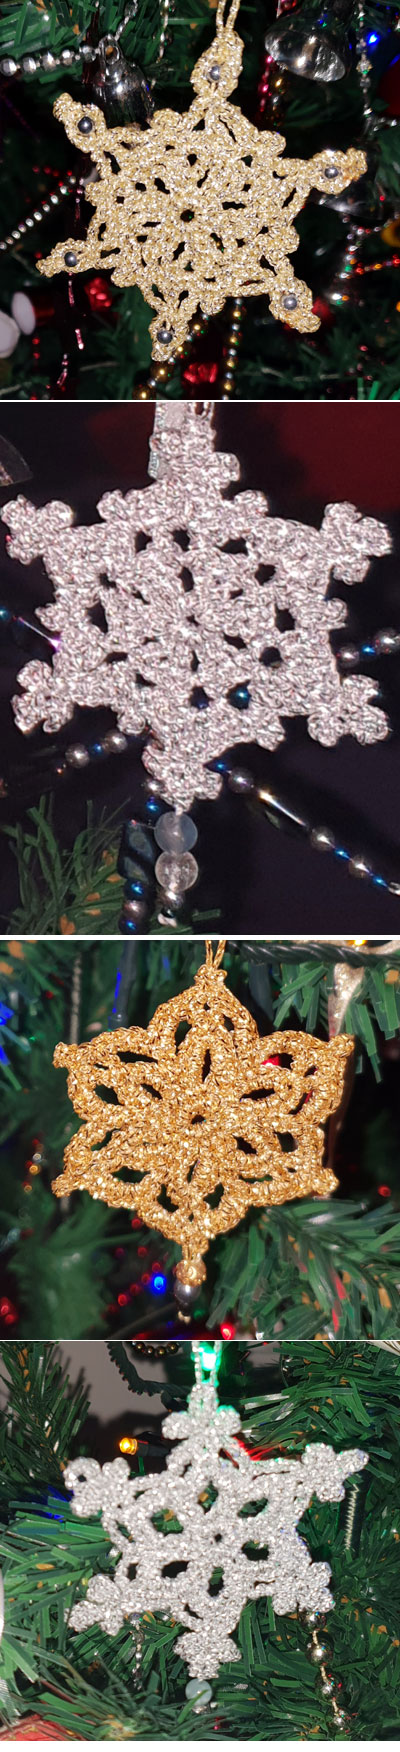
Beaded Snowflakes cat-safe decorations
Beadsmith makes wire snowflake forms in a variety of sizes. They’re great fun to make and very effective. The bigger sizes can make great suncatchers too.
Tools: Snowflake forms, beads, round-nose jewelry pliers, narrow ribbon or cord for hanging.
Optional extras: Snipe-nose jewelry pliers (not essential, but they make things a little easier), a beading mat.
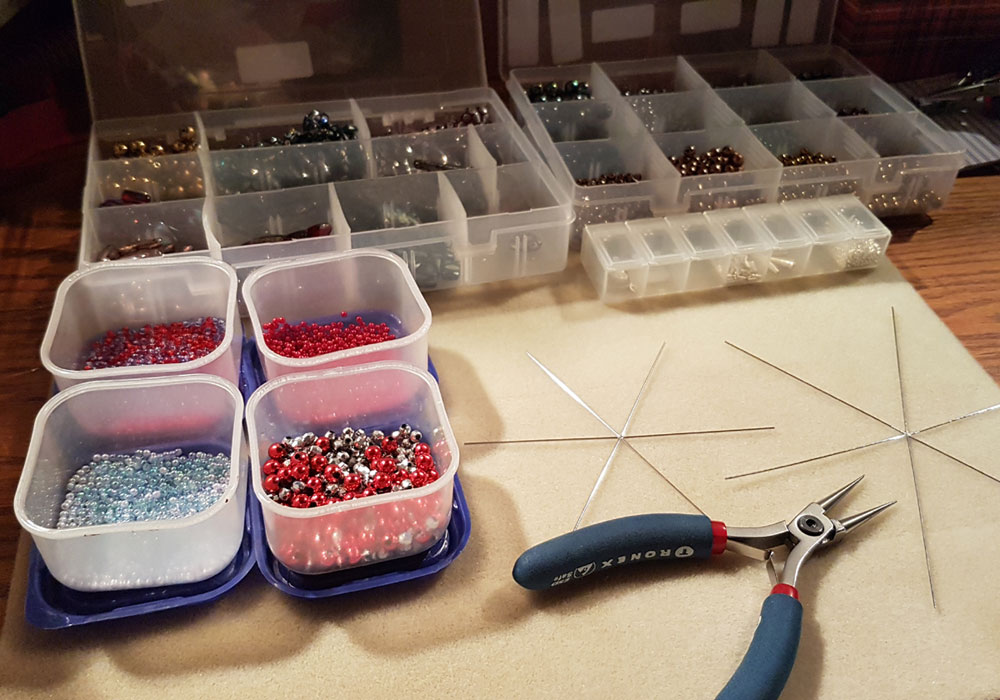
Pick out your beads and color scheme. I use a variety of different shapes and materials - gemstone beads, Czech glass lampwork beads, plastic beads, metal beads, and sometimes even sterling silver!
The only ‘rule’ is that you need tiny beads for the center of the snowflake, where the spokes are closest together - beads around 1.8-2.5mm/aught size 8-11 work best.
Just keep Kitty away from them! Beads this small are a nightmare to find and pick up if dropped (I’ve spent many hours searching for tiny beads that got away from me).
Decide on your design. I usually experiment with a few different combinations before settling on one, just threading and removing the beads until I’m happy with the look.
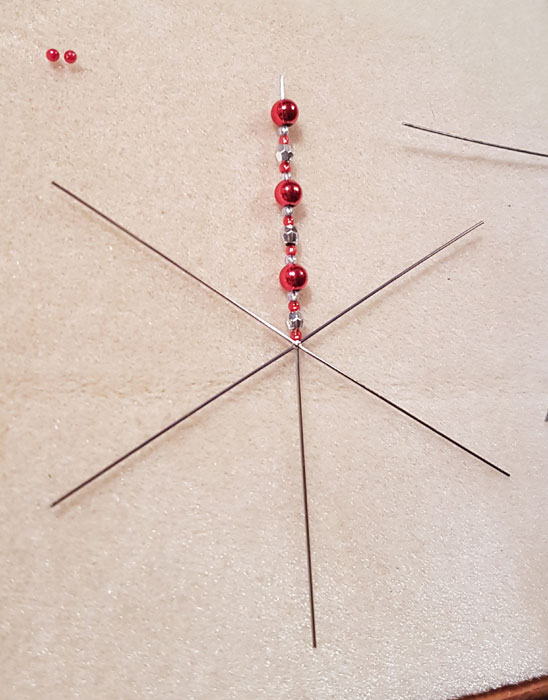
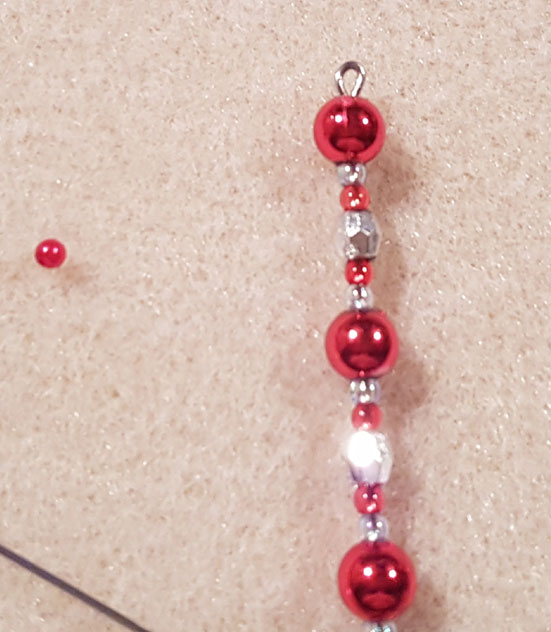
Once you’ve settled on a design, you can get to work. Thread your beads onto one of the spokes, leaving around 1 cm/0.5-inch space at the top.
Using your (round or snipe-nose) pliers, bend the top of the wire out to an angle of at least 45º.

Remove the jewelry pliers, then reposition them at the tip of the spoke. From there, ease the wire around to form a loop.
A bit of force is needed here, as the wire is very stiff. Making a loop like this is, in my opinion, the safest way to finish each spoke - especially with cats around.
You can buy stoppers for the tips of the wire, but I’d be worried about them getting knocked off (and leaving the bare wire exposed).
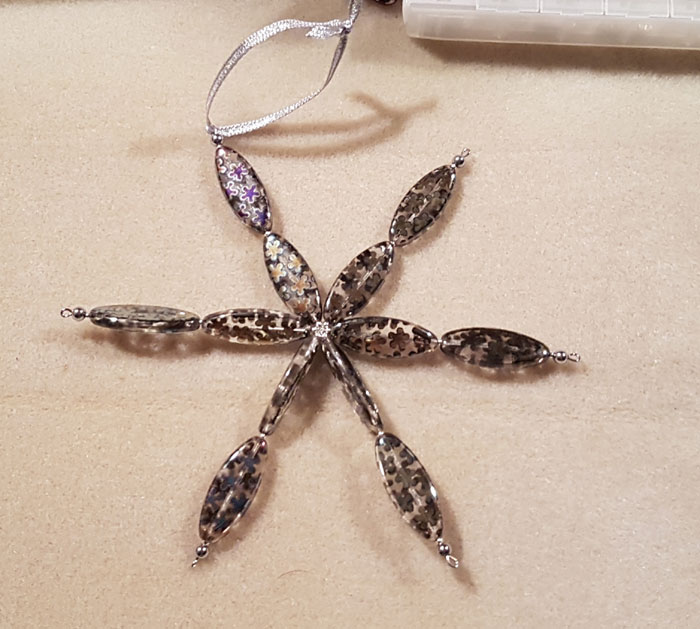
Repeat the bead threading and wire looping on each spoke, until all six are complete.
Lastly, thread a length of narrow ribbon through one of the loops, ready for hanging on the tree.

Air-drying cat-safe clay ornaments
Air-drying clay (like Das) is a wonderful medium for making ornaments and is very simple too.
Tools: Clay, rolling pin, cookie cutters, a blunt pencil, paint and a paintbrush for decorating, varnish, ribbon or cord for hanging, and a plastic sheet (such as a heavy-duty trash bag) to work on.
These ornaments are child’s play to make, and I loved making them when I was little.
Take a lump of clay and roll it out to a thickness of around 0.5 cm/0.25 inch. Thicker means it will take forever to dry, and thinner will make the ornaments too fragile.
Once evenly rolled out, take your cookie cutters and start cutting - just as if you were making cookies.
Use the pencil to poke a hole near the top of each ornament, then set them aside to dry. Different clays take different amounts of time, so be sure to read the pack instructions. As a guide, though, allow 24-48 hours.
Once they’re dry, the fun really begins. I used powder paint (powder tempera) for my ornaments and started by painting the front, sides, and back of each ornament in one color. Set aside to dry once more.
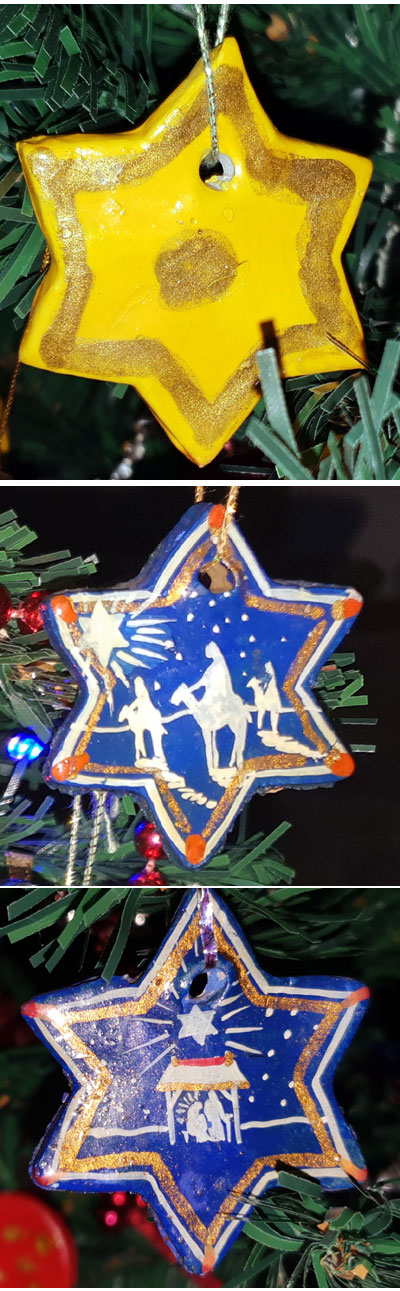
With the base color painted, you can be as simple or fancy as you like with the design. I’m no artist, so I stuck with simple patterns/accents in gold paint. A talented family friend created these beautiful Nativity scenes.
Both are striking in their own way. Once your design is complete, set it aside to dry yet again (don’t worry - you’re nearly there now!).
Lastly, give each ornament a coat of varnish designed for use on air-dried clay. This will give a lovely shiny finish and protect your artwork. Set aside to dry for the final time.
When completed, just thread some cord or narrow ribbon through the holes, and hang them on the tree.
Pine cone-based cat-safe decorations
Pine cones are fitting at Christmas time, and there are lots of ways to make them stand out. Adding glitter glue to the tips of each section is a simple and effective way to make them stand out.
Another idea is to spray or paint them with metallic paint, or even flocking/snow spray.
Just make sure they’re dry before nestling them in the tree. They make wonderful additions to Christmas decor elsewhere in the home, too.
Crochet/knitted cat-safe ornaments
If you’re a knitter or crocheter, it's a wonderful way to make decorations (or even garlands) that will be perfectly seasonal but also cat-safe. A friend gave me these beautiful micro-crochet decorations last year.
As with cross stitch, there are loads of ideas and free patterns online.
A variation on yarn ornaments is amigurumi crochet. This is a Japanese style of crochet that’s perfect for making 3D ornaments (and even cat toys too). Again, check online for patterns and inspiration.
Other ideas for cat-safe decorating
With cats around, tinsel is out, and ribbon bows or garlands are often out too (depending on your cat’s tastes in ‘toys’). Instead, why not try these alternatives?
Paper chains
They’re cat safe and fun to make, despite not being the most durable of decorations.
Bead garlands
These are available in some craft stores, and online too. If you can’t find bead garlands, look for metallic or iridescent plastic bead edging/trim in haberdashery stores/departments.
They’ll often have big rolls of these bead trims, and sell them by the meter/yard. They look wonderful strung around the tree, glinting in the glow of Christmas lights.
Christmas crackers
We’ve always nestled mini Christmas crackers in amongst the tree branches, just peeping out. They’re pretty cat-safe too, as long as Kitty doesn’t break into them.
Decor alternatives (for when a tree is just too much kitty temptation)
Mason jars (or any screw top jars): Fill these with battery-operated micro fairy lights. They look so pretty when lit up.
Last year, I filled a vase with a bead garland and arranged a string of microlights on top.
Light garlands: If you have high enough places that Kitty can’t access, strings of light garlands look beautiful - either on their own or as part of a bigger arrangement.
Mini Christmas trees: even if a regular tree is off-limits, desktop-sized Christmas trees can often work. I lit some with micro fairy lights and dotted them about the house in inaccessible-to-cats spots.
My other big go-to is ornamental candle holders filled with battery-operated flameless candles. My guys did steal the candles occasionally, but there isn’t much there to hurt them. There’s something about candles that says ‘Christmas’ to me.
SIGN UP FOR THECATSITE'S EMAIL UPDATES >
Laura is a passionate, self-taught hobby crafter. She lives in Yorkshire with her 3 cats (aka feline assistants and designers), a lovely Labrador, and a cheeky Exmoor pony. You can follow Laura to see more of her designs on Instagram at @ashacat_designs
Note: We may get commissions for purchases made through links on this page.

3 comments on “17+ Ideas For Cat-safe Holiday Decorations (An Illustrated Guide)”